Using Pi-hole On A Raspberry Pi: Conclusion

Raspberry PiThis post is part of the series on using the Pi-hole; this series is a sub-series of the Adventures with a Raspberry Pi.

I’ve been a Windows user ever since I first started using a PC back in 1995; my exposure to other operating systems has been very limited so I was slightly tentative about buying a Raspberry Pi and setting up Pi-hole. I have to say that the process has been very smooth and the Pi-hole is an effective ad blocker.

The Pi-hole admin interface is very easy to use and the few items which need to be performed at command line are nice and straightforward. If I’d known how easy it was going to be and how effective the Pi-hole is ad stopped adverts, I’d have built one much earlier than I did.

Adventures With A Raspberry Pi

Adventures With A Raspberry Pi
Building The Raspberry Pi: CanaKit Raspberry Pi 3 B+ Complete Starter Kit
Building The Raspberry Pi: Raspberry Pi Build
Building The Raspberry Pi: Install Operating System
Building The Raspberry Pi: First Run
Building The Raspberry Pi: System Configuration Tool
Building The Raspberry Pi: Enable SSH For Remote Access
Building The Raspberry Pi: Securing the Raspberry Pi
Building The Raspberry Pi: Conclusion
Installing Pi-hole On A Raspberry Pi: What is Pi-hole?
Installing Pi-hole On A Raspberry Pi: Install Pi-hole
Installing Pi-hole On A Raspberry Pi: Change Pi-hole Admin Password
Installing Pi-hole On A Raspberry Pi: Configure Network to use Pi-hole
Using Pi-hole On A Raspberry Pi: Blocked Adverts
Using Pi-hole On A Raspberry Pi: Admin Interface
Using Pi-hole On A Raspberry Pi: Disabling Pi-hole
Using Pi-hole On A Raspberry Pi: Whitelisting a Site
Using Pi-hole On A Raspberry Pi: Update Blocklists
Using Pi-hole On A Raspberry Pi: Maintain Blocklists
Using Pi-hole On A Raspberry Pi: Change DNS Servers
Using Pi-hole On A Raspberry Pi: Connecting With SSH
Using Pi-hole On A Raspberry Pi: Updating the Pi-hole
Using Pi-hole On A Raspberry Pi: Conclusion
What Else Can I Use It For?
Prepare New SD Card For Raspberry Pi OS: Download SD Card Formatter
Prepare New SD Card For Raspberry Pi OS: Install SD Card Formatter
Prepare New SD Card For Raspberry Pi OS: Format SD Card
Prepare New SD Card For Raspberry Pi OS: Download NOOBS
Prepare New SD Card For Raspberry Pi OS: Copy Files To The SD Card
Prepare New SD Card For Raspberry Pi OS: Conclusion
Installing Pi-hole On A Raspberry Pi: Changing the IP Address
Raspberry PI Update Fails
Check Version of OS on Raspberry Pi
How to Update the OS on a Raspberry Pi

Implementing SmartList Builder: Register

eOne SolutionsThis post is part of the series on Implementing SmartList Builder from eOne Solutions.

If you’re testing SmartList Builder, you can use it in the Famrikam Sample company without entering a registration key. However, yo use it on a normal company, even a test one, you will need to input the key.

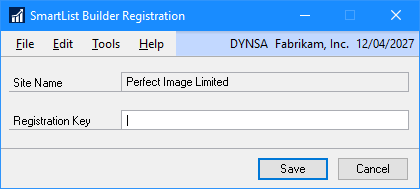
To do this, log into Microsoft Dynamics GP as a user with the POWERUSER* role and open the SmartList Builder Register window (Administration area page » Setup » SmartList Builder » Register SmartList Builder) and enter the key in the Registration Key field:

SmartList Builder Register

Click Save to sdave the key and close the window.