New Functionality In Microsoft Power Automate 2024 Wave 1: Connect Your Own Virtual Network with Hosted Machine Group

Power AutomateThis post is part of the New Functionality In Microsoft Power Automate 2024 Wave 1 series in which I am taking a look at the new functionality introduced in Microsoft Power Automate 2024 Wave 1.

The 8th of the new functionality in the Desktop Flows section is connect your own virtual network with hosted machine group.

Users can run desktop flows using a hosted machine group connected to their own virtual network (VNet) in order to execute RPA jobs that require access to on-premises networks.

Enabled for: Admins, makers, marketers, or analysts, automatically
Public Preview: Mar 2024
Early Access: –
General Availability: Apr 2024

Feature Details

Users can now seamlessly integrate a hosted machine group (HMG) with their own VNet. This integration enables users to run desktop flows and execute RPA jobs that require access to on-premises networks. By leveraging their own VNet, users can ensure secure and reliable connectivity between the hosted machines and the on-premises networks.

Click to show/hide the New Functionality In Microsoft Power Automate 2024 Wave 1 Series Index

Error When Connecting Jet Reports to Microsoft Dynamics 365 Business Central for the First Time

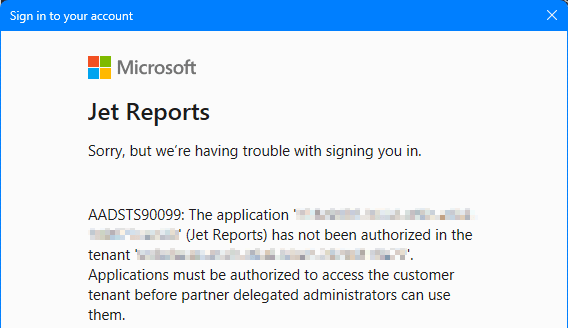
Jet ReportsWhile implementing Microsoft Dynamics 365 Business Central recently for a clinet, we also implemented Jet Reports. After installing the extension in Business Central, I created a data source and tried to log in, but received this error message:

Jet reports sign in error

Jet reports

Sorry, but we're having trouble with signing you in.

AADSTS90099: The application '~~~~~~~' (Jet Reports) has not been authorised in the tenant '~~~~~~~'. Applications must be authorised to access the customer tenant before partner delegated administrators can use them.

It’s actually an obvious one which I should have remembered; the first sign into the data source is the one which grants permissions to sign in and so needs to be done by a Microsoft 365 administrator for the Business Central tenant.

As the Business Central partner, this was not me. After co-ordinating with the client and their Microsoft 365 partner, we got an administrator to sign into the data source for the first time, granting permissions as they did so, after which I was able to confirm the data source worked and giving users at the client access.

New Functionality In Microsoft Power Automate 2024 Wave 1: Generate Flow Description Using AI

Power AutomateThis post is part of the New Functionality In Microsoft Power Automate 2024 Wave 1 series in which I am taking a look at the new functionality introduced in Microsoft Power Automate 2024 Wave 1.

The 7th of the new functionality in the Desktop Flows section is generate flow description using AI.

Users are able to generate a description of a flow without having to analyze the actions inside it.

Enabled for: Admins, makers, marketers, or analysts, automatically
Public Preview: Apr 2024
Early Access: –
General Availability: –

Feature Details

You can now create a flow description by the press of a button without having to open the flow and read the actions inside it.

To do so from Power Automate for desktop, open the console, navigate to the My flows tab, and locate the flow that you want to create a description. Then, go to flow properties and under the general flow properties tab, press the Let Copilot create description button. Copilot will then analyze your flow and generate the flow description.

You can also generate a flow description from the portal. To do so, locate the desktop flow that you want to create the description for and press on the details item from the flow menu. Then, press on the edit button in the details section of the flow and finally select the Let Copilot create description button.

Geographic areas

This feature will be released into the following Microsoft Azure geographic area:

  • United States

Click to show/hide the New Functionality In Microsoft Power Automate 2024 Wave 1 Series Index

New Functionality In Microsoft Power Automate 2024 Wave 1: Use Azure Key Vault Credentials in Flow Connections

Power AutomateThis post is part of the New Functionality In Microsoft Power Automate 2024 Wave 1 series in which I am taking a look at the new functionality introduced in Microsoft Power Automate 2024 Wave 1.

The 6th of the new functionality in the Desktop Flows section is use Azure Key Vault credentials in flow connections.

Users can leverage credentials from Azure Key Vault to connect to Windows sessions on desktop flow machines. This feature supports rotating passwords without the need to update the connection

Enabled for: Admins, makers, marketers, or analysts, automatically
Public Preview: Oct 31, 2023
Early Access: –
General Availability: Jun 2024

Feature Details

With this feature, users can have their desktop flows run on Windows machines logged in with credentials from Azure Key Vault. The Windows machine retrieves the latest credentials at runtime. This enables desktop flows to keep running successfully even when the administrator changes the password.

Click to show/hide the New Functionality In Microsoft Power Automate 2024 Wave 1 Series Index

Error Message Creating a Physical Inventory Journal in Microsoft Dynamics 365 Business Central: “Phys. inventory must be equal to ‘Yes’ …”

Microsoft Dynamics 365 Business CentralI helped a client implement Microsoft Dynamics 365 Business Central recently and after training while they were doing UAT, they came to me with an issue when trying to do an adjustment to book stock into the system.

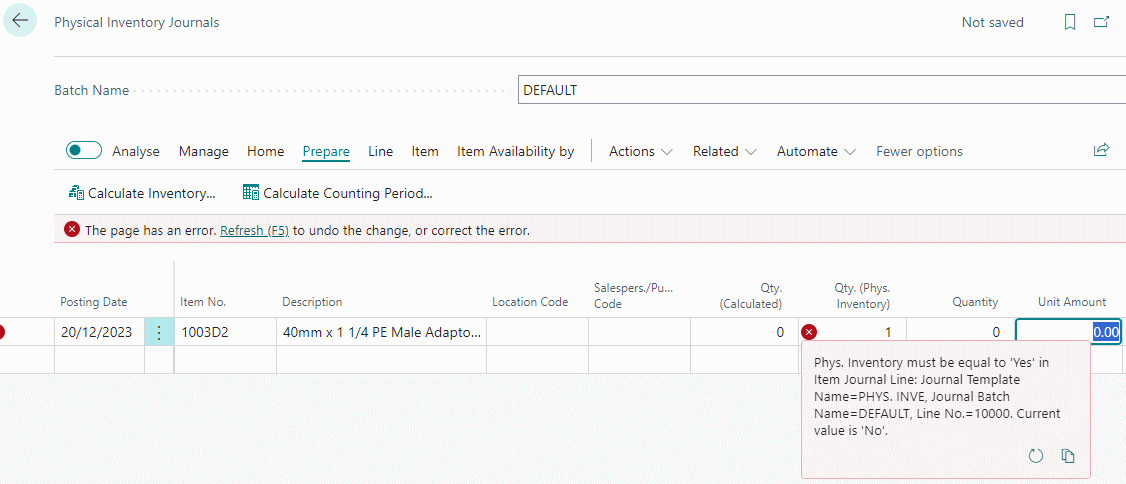
They were just trying to get some stock booked into the system quickly so that they could do some testing of the sales process, so they were trying to do a journal to get the stock in. However, when they entered the item onto the journal they were receiving an error:

Physical Inventory Journal page

Phys inventory must be equal to 'Yes' in Item Journal Line: Journal Template Name=PHYS. INVE. Journal Batch Name=DEFAULT, Line No.=10000. Current value is 'No'.

This error is because they were working in the wrong inventory journal page. They were on the Physical Inventory Journal page which is used by the stock count process and where you do not manually enter the lines, but instead use the Prepare » Calculate Inventory… action to populate the lines.

Instead, they should have been using the Item Journal page which is where you enter any positive and negative adjustments. Once they were directed at the correct page, they were able to get the stock adjustment done and continue testing the sales process.

The “correct” process they should have used, was not doing an adjustment at all, but have someone raise a purchase order and process the receipt for the goods as this is the way that processing would be done post go-live. However, in this instance, they were doing unit testing of a change specific to the despatch of sales orders and the team members from purchasing weren’t available and wanted to avoid delays in testing the sales side.

New Functionality In Microsoft Power Automate 2024 Wave 1: Use CyberArk Credentials in Desktop Flow Connections

Power AutomateThis post is part of the New Functionality In Microsoft Power Automate 2024 Wave 1 series in which I am taking a look at the new functionality introduced in Microsoft Power Automate 2024 Wave 1.

The 4th of the new functionality in the Desktop Flows section is use CyberArk credentials in desktop flow connections.

You can now use credentials stored in CyberArk Central Credential Provider when connecting to Windows sessions on desktop flow machines.

Enabled for: Admins, makers, marketers, or analysts, automatically
Public Preview: Jun 2024
Early Access: –
General Availability: To be announced

Feature Details

Users can leverage credentials stored in Cyberark Central Credential Provider to connect to Windows sessions on desktop flow machines. Credentials are not stored in Power Automate but retrieved during runtime. This feature supports rotating passwords without the need to update the connection.

Click to show/hide the New Functionality In Microsoft Power Automate 2024 Wave 1 Series Index

New Functionality In Microsoft Power Automate 2024 Wave 1: Create Desktop Flows Using Natural Language with Copilot

Power AutomateThis post is part of the New Functionality In Microsoft Power Automate 2024 Wave 1 series in which I am taking a look at the new functionality introduced in Microsoft Power Automate 2024 Wave 1.

The 5th of the new functionality in the Desktop Flows section is create desktop flows using natural language with copilot.

Introducing copilot in Power Automate for desktop – the new natural language feature that simplifies automation creation. Say goodbye to complex coding and hello to effortless desktop flows. Boost productivity and efficiency with copilot today. By leveraging natural language, users can easily create desktop flows without the need for complex coding. This allows for increased productivity and efficiency, freeing up valuable time and resources for other important tasks.

Enabled for: Admins, makers, marketers, or analysts, automatically
Public Preview: May 2024
Early Access: –
General Availability: –

Feature Details

The copilot functionality in Power Automate for desktop offers a user-friendly interface that simplifies the automation creation process. With natural language capabilities, makers can create desktop flows by providing instructions in plain English, eliminating the need for algorithmic or pseudocode knowledge. This feature is especially useful in scenarios where loops and conditionals are required, as it streamlines the process and reduces the need for complex coding. With copilot, users can generate automations with ease, saving valuable time and resources.

My Opinion

More enhancements to add Copilot to a new area. In theory, this could be quite good, but I’ve not had much luck with Copilot in other areas of Power Automate, in terms of getting it to create a flow which meets requirements.

Click to show/hide the New Functionality In Microsoft Power Automate 2024 Wave 1 Series Index

In Microsoft Dynamics 365 Business Central (Development), how do I… How to Upload an Extension

Microsoft Dynamics 365 Business CentralThis post is part of the In Microsoft Dynamics 365 Business Central (Development), how do I… series and of the wider In Microsoft Dynamics 365 Business Central, how do I… series which I am posting as I familiarise myself with Microsoft Dynamics 365 Business Central.

I’m jumping a little ahead in this series by covering the upload of an extension before covering any development steps, but development isn’t my area as such (I’m a consultant, not a developer) and this came up on a project with a client where the MADIC dynamics development team did the work on creating the extension.

When you have the extension app file, this can be uploaded to your instance of Business Central. This is done from the Extension Management page by clicking the Manage » Upload Extension… action:

Extension Management page with Manage menu open and Upload Extension action highlighted

Continue reading “In Microsoft Dynamics 365 Business Central (Development), how do I… How to Upload an Extension”

In Microsoft Dynamics 365 Business Central (Development), how do I… Series Index

Microsoft Dynamics 365 Business CentralI have recently started working with Microsoft Dynamics 365 Business Central and have decided to blog about it as I learn; I’ve started a In Microsoft Dynamics 365 Business Central, how do I… series which will include everything, but have also decided to break that down into a set of smaller series on specific areas of Dynamics BC.

This is the series index for the Development related posts I will be writing. The series index, below, will automatically update as each post in the series goes live so make sure you bookmark this post so you can see keep up-to-date with my journey into Business Central.

It should be noted that I am a functional consultant and not a developer, so I expect this series will be low on content and only cover some fairly basic aspects of development with Business Central.

Continue reading “In Microsoft Dynamics 365 Business Central (Development), how do I… Series Index”

Jet Reports with Microsoft Dynamics 365 Business Central Book Available

Microsoft Dynamics 365 Business CentralI have a new book available now called Jet Reports with Microsoft Dynamics 365 Business Central; this book is aimed at end-users or consultants looking to use Jet Reports with Microsoft Dynamics 365 Business Central for financial and/or operational reporting.

The book covers the basics of installing and configuring Jet Reports as well as how to design and build reports using the Excel Add-in, before moving on to step-by-step guides on creating six different types of report and closing with a look at the report building tools, Jet Hub and report distribution.

Jet Reports with Microsoft Dynamics 365 Business Central by Ian Grieve

The book is available as an eBook direct from my azurecurve Publishing site (always with a discount of $5, but with an additional discount of 20% until end of April using voucher code EASTER2024) or from Amazon:

The book is structured into these chapters:

  • Chapter 1, Introduction to Jet Reports, introduces Jet Reports and explains what type of reporting for which it can be used.
  • Chapter 2, Implementing Jet Reports, covers the installation of Jet Reports including the Jet Service Tier and Jet Hub.
  • Chapter 3, Configuring Jet Reports, shows how to configure Jet Reports once it has been installed.
  • Chapter 4, Introducing the Excel Add-in, introduces the Excel Add-in and the features available.
  • Chapter 5, Report Structure, shows how reports can be structured to make maintaining them easier.
  • Chapter 6, Using the functions in the Excel Add-in, shows how each of the four Jet Functions can be used.
  • Chapter 7, Creating and using an Options page, covers the creation and use of an options page in reports.
  • Chapter 8, Create a Summary Trial Balance, steps through the creation of a Summary Trial Balance report.
  • Chapter 9, Create a Detailed Trial Balance, shows how to make the Summary TB from the previous chapter into a Detailed report.
  • Chapter 10, Create a Balance Sheet, covers the creation of a formatted Balance Sheet.
  • Chapter 11, Create an Income Statement, covers the creation of an Income Statement and how to make it an intercompany/consolidated version.
  • Chapter 12, Create a Summary Payables Aged Trial Balance, shows how to create a Summary Payables Trial Balance report.
  • Chapter 13, Create a Sales Invoice by Customer Report, covers the creation of an operational report on sales invoices.
  • Chapter 14, Report Creation Tools, introduces the tools which can be used to make creating reports easier.
  • Chapter 15, Using Jet Hub, shows how users can access Jet Reports via web access and without a local install of Jet Reports.
  • Chapter 16, Report Distribution, shows how users can schedule or generate reports into Microsoft Word.

If you buy this or any other ebook from me directly, the coupon code EASTER2024 will get you 20% off (until the end of April 2024).