New Functionality In Microsoft Power Automate 2024 Wave 1: Generate Flow Description Using AI

Power AutomateThis post is part of the New Functionality In Microsoft Power Automate 2024 Wave 1 series in which I am taking a look at the new functionality introduced in Microsoft Power Automate 2024 Wave 1.

The 7th of the new functionality in the Desktop Flows section is generate flow description using AI.

Users are able to generate a description of a flow without having to analyze the actions inside it.

Enabled for: Admins, makers, marketers, or analysts, automatically
Public Preview: Apr 2024
Early Access: –
General Availability: –

Feature Details

You can now create a flow description by the press of a button without having to open the flow and read the actions inside it.

To do so from Power Automate for desktop, open the console, navigate to the My flows tab, and locate the flow that you want to create a description. Then, go to flow properties and under the general flow properties tab, press the Let Copilot create description button. Copilot will then analyze your flow and generate the flow description.

You can also generate a flow description from the portal. To do so, locate the desktop flow that you want to create the description for and press on the details item from the flow menu. Then, press on the edit button in the details section of the flow and finally select the Let Copilot create description button.

Geographic areas

This feature will be released into the following Microsoft Azure geographic area:

  • United States

Click to show/hide the New Functionality In Microsoft Power Automate 2024 Wave 1 Series Index

New Functionality In Microsoft Power Automate 2024 Wave 1: Use Azure Key Vault Credentials in Flow Connections

Power AutomateThis post is part of the New Functionality In Microsoft Power Automate 2024 Wave 1 series in which I am taking a look at the new functionality introduced in Microsoft Power Automate 2024 Wave 1.

The 6th of the new functionality in the Desktop Flows section is use Azure Key Vault credentials in flow connections.

Users can leverage credentials from Azure Key Vault to connect to Windows sessions on desktop flow machines. This feature supports rotating passwords without the need to update the connection

Enabled for: Admins, makers, marketers, or analysts, automatically
Public Preview: Oct 31, 2023
Early Access: –
General Availability: Jun 2024

Feature Details

With this feature, users can have their desktop flows run on Windows machines logged in with credentials from Azure Key Vault. The Windows machine retrieves the latest credentials at runtime. This enables desktop flows to keep running successfully even when the administrator changes the password.

Click to show/hide the New Functionality In Microsoft Power Automate 2024 Wave 1 Series Index

Error Message Creating a Physical Inventory Journal in Microsoft Dynamics 365 Business Central: “Phys. inventory must be equal to ‘Yes’ …”

Microsoft Dynamics 365 Business CentralI helped a client implement Microsoft Dynamics 365 Business Central recently and after training while they were doing UAT, they came to me with an issue when trying to do an adjustment to book stock into the system.

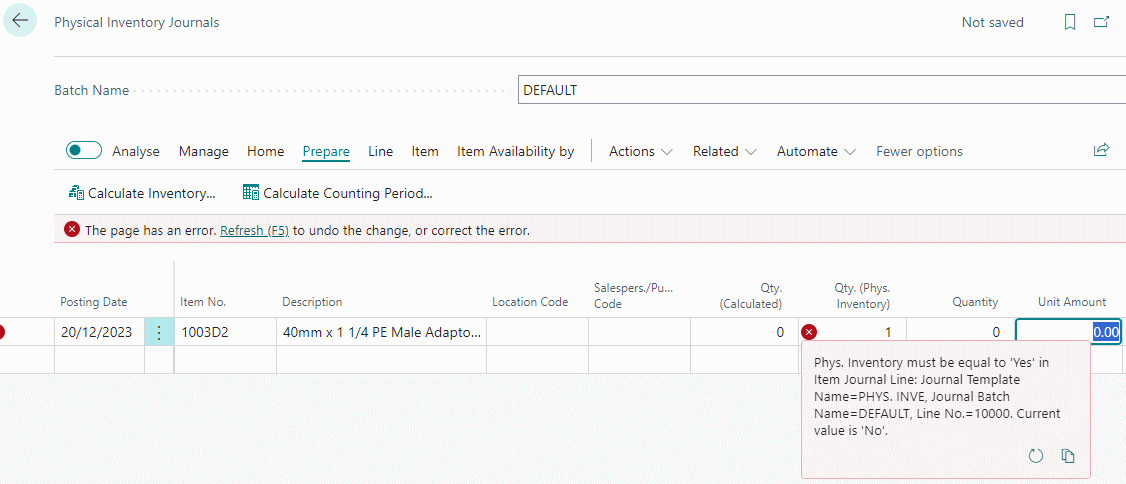
They were just trying to get some stock booked into the system quickly so that they could do some testing of the sales process, so they were trying to do a journal to get the stock in. However, when they entered the item onto the journal they were receiving an error:

Physical Inventory Journal page

Phys inventory must be equal to 'Yes' in Item Journal Line: Journal Template Name=PHYS. INVE. Journal Batch Name=DEFAULT, Line No.=10000. Current value is 'No'.

This error is because they were working in the wrong inventory journal page. They were on the Physical Inventory Journal page which is used by the stock count process and where you do not manually enter the lines, but instead use the Prepare » Calculate Inventory… action to populate the lines.

Instead, they should have been using the Item Journal page which is where you enter any positive and negative adjustments. Once they were directed at the correct page, they were able to get the stock adjustment done and continue testing the sales process.

The “correct” process they should have used, was not doing an adjustment at all, but have someone raise a purchase order and process the receipt for the goods as this is the way that processing would be done post go-live. However, in this instance, they were doing unit testing of a change specific to the despatch of sales orders and the team members from purchasing weren’t available and wanted to avoid delays in testing the sales side.