Create SmartConnect Journal – Standard Map: Prerequisites

eOne SolutionsThis post is part of a series on creating a Journal – Standard integration using SmartConnect from eOne Solutions; I recently posted a series on Implementing SmartConnect.

The prerequisites for creating a new integration map are quite straight forward:

    Decide on the type of integration to be created.
  • Decide how the integration should work.
  • Create the source data template.

The integration I am creating as part of this series is one of the easiest which can be created; it is a standard General journal integration. I always create this map after implementing SmartConnect (and before starting to use SmartConnect, Integration Manager) as it is a quick and easy one to create and which will be useful to all clients.

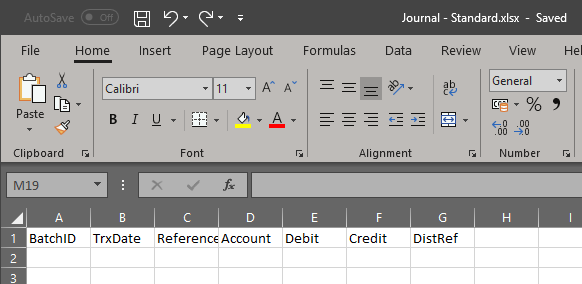
The most useful way of creating this integration for clients, is to create an integration which polls a folder every few minutes on a schedule and which reads data from an Excel spreadsheet. This approach allows one integration to be set up and usuable by all users; as it is a folder being polled, the files dropped into the folder can have any name and, as long as the format matches the template, SmartConnect will attempt to integrate the data.

In the past when using Integration Manager, the source file would be a CSV or TXT file as Integration Manager couldn’t easily handle Excel spreadsheets; SmartConnect has no such limitation, so I am going to use the Excel version of the Integration Manager template:

Excel spreadsheet source with BatchID, TrxDate, Reference, Account, Debit, Credit and DistRef columns

With the above decided and in place, the next post, in this series, will start to cover the creation of the integration map in SmartConnect.

Create SmartConnect Journal – Standard Map: Series Index

eOne SolutionsI recently did a series on Implementing SmartConnect, from eOne Solutions; in this series I am going to create a simple integration map to show how SmartConnect can be used to integrate standard journals into Microsoft Dynamics GP from a predefined folder.

The series index below will update as each post in the series goes live (unless you’re reading a syndicated version of this post in which case check back to the original post).

Create SmartConnect Journal – Standard Map
Create Integration Map
Configure Destination
Configure Distributions
Define Header Mapping
Run Integration
Schedule Integration
Connection Could Not be Validated Error
Credit Amount Was Not Supplied Error
Could Not Run The Scheduled Map
Conclusion

Implementing SmartConnect: Conclusion

eOne SolutionsThis post is part of the series on Implementing SmartConnect, an integration tool from eOne Solutions, which can take data from any source and integrate it into Microsoft Dynamics GP (and other systems such as Microsoft Dynamics CRM or Sales Force amongst others). It has a drag and drop interface to make creating integrations quick and easy for all users rather than just developers (as many integration tools target).

Over the course of the last few weeks, I have installed and configured SmartConnect from eOne Solutions. The installation is fairly straightforward, but you do need to make sure that tasks are completed in order.

With SmartConnect installed, the next step is to create an integration. Therefore, in a few weeks, I’ll be doing a small series on creating a simple integration. For testing that SmartConnect itself is working, I usually create a Standard Journal integration; it’s a nice simple one, but one which is useful to all clients.

Implementing SmartConnect: Verify Connector Working

eOne SolutionsThis post is part of the series on Implementing SmartConnect, an integration tool from eOne Solutions, which can take data from any source and integrate it into Microsoft Dynamics GP (and other systems such as Microsoft Dynamics CRM or Sales Force amongst others). It has a drag and drop interface to make creating integrations quick and easy for all users rather than just developers (as many integration tools target).

With SmartConnect installed and configured, the last step is to verify that the GP Connection is working. This is done by checking to make sure the e Connect nodes are available.

Select the Maintenance tab and click on Node Maintenance button on the GP Connector section of the action pane:

Maintenance tab

Continue reading “Implementing SmartConnect: Verify Connector Working”

Implementing SmartConnect: Run System Maintenance

eOne SolutionsThis post is part of the series on Implementing SmartConnect, an integration tool from eOne Solutions, which can take data from any source and integrate it into Microsoft Dynamics GP (and other systems such as Microsoft Dynamics CRM or Sales Force amongst others). It has a drag and drop interface to make creating integrations quick and easy for all users rather than just developers (as many integration tools target).

Despite system maintenance having run automatically when the SmartConnect GP Connector was configured, it needs to be run again. Do this by selecting the Setup tab and click on System Maintenance:

SmartConnect Setup tab

Continue reading “Implementing SmartConnect: Run System Maintenance”

Implementing SmartConnect: Configure Security

eOne SolutionsThis post is part of the series on Implementing SmartConnect, an integration tool from eOne Solutions, which can take data from any source and integrate it into Microsoft Dynamics GP (and other systems such as Microsoft Dynamics CRM or Sales Force amongst others). It has a drag and drop interface to make creating integrations quick and easy for all users rather than just developers (as many integration tools target).

For SmartConnect to function correctly, the service account needs to be added as a user. Do this by opening the Security window from the Setup tab:

SmartConnect Setup tab

Continue reading “Implementing SmartConnect: Configure Security”

Implementing SmartConnect: Configure GP Connector

eOne SolutionsThis post is part of the series on Implementing SmartConnect, an integration tool from eOne Solutions, which can take data from any source and integrate it into Microsoft Dynamics GP (and other systems such as Microsoft Dynamics CRM or Sales Force amongst others). It has a drag and drop interface to make creating integrations quick and easy for all users rather than just developers (as many integration tools target).

The next step in implementing SmartConnect is to configure the connector with Microsoft Dynamics GP; do this by clicking on the Setup tab and then on the Setup button on the action pane:

SmartConnect Setup menu

Continue reading “Implementing SmartConnect: Configure GP Connector”

Implementing SmartConnect: Console First Run

eOne SolutionsThis post is part of the series on Implementing SmartConnect, an integration tool from eOne Solutions, which can take data from any source and integrate it into Microsoft Dynamics GP (and other systems such as Microsoft Dynamics CRM or Sales Force amongst others). It has a drag and drop interface to make creating integrations quick and easy for all users rather than just developers (as many integration tools target).

Over the last few posts, I’ve stepped through the installation of SmartConnect and the GP Addin. With that done we can now log into SmartConnect itself and go through the final steps of preparing it for use.

SmartConnect is launched from the Windows Start menu; the first run should be using the account used to install it as this is the first administrator account. The server name will already be displayed, so click OK to login (login used Windows authentication):

SmartConnect Login

Continue reading “Implementing SmartConnect: Console First Run”

Implementing SmartConnect: Update GP Cache

eOne SolutionsThis post is part of the series on Implementing SmartConnect, an integration tool from eOne Solutions, which can take data from any source and integrate it into Microsoft Dynamics GP (and other systems such as Microsoft Dynamics CRM or Sales Force amongst others). It has a drag and drop interface to make creating integrations quick and easy for all users rather than just developers (as many integration tools target).

With the SmartConnect GP Addin installed the next step is to use it to populate the GP Resource Cache.

To do this open the SmartConnect Maintenance window (Microsoft Dynamics GP menu » Tools » SmartConnect » SmartConnect Maintenance) and click the Process button:

SmartConnect Maintenance

Continue reading “Implementing SmartConnect: Update GP Cache”

Implementing SmartConnect: Install GP Addin

eOne SolutionsThis post is part of the series on Implementing SmartConnect, an integration tool from eOne Solutions, which can take data from any source and integrate it into Microsoft Dynamics GP (and other systems such as Microsoft Dynamics CRM or Sales Force amongst others). It has a drag and drop interface to make creating integrations quick and easy for all users rather than just developers (as many integration tools target).

The next step in installing SmartConnect, is to install the GP Addin. This was in the zip we downloaded as part of the installation post; launch the SmartConnect GP Addin….exe.

Select the relevant version of Microsoft Dynamics GP from the list and click Next:

SmartConnect - Select which components of SmartConnect GP Addin will be installed

Continue reading “Implementing SmartConnect: Install GP Addin”