Implementing Fastpath’s Assure Suite: Pre-installation steps

FastpathThis post is part of the series on Implementing Fastpath's Assure Suite.

When you place an order for the Fastpath Assure Suite, you are asked to complete a questionnaire; this is important to get correct as the details on this questionnaire will form the basis for both your registration key and how the Fastpath portal connects to your local system.

Once the questionnaire has been sent to Fastpath, they will create the necessary configuration on their side, including setting up the Fastpath portal; you will get both test and production portals created.

One of the details you’ll supply is the main administrator and how they will sign in (Microsoft Account or Fastpath account); along with your portal details you will also receive a log in to the support portal for the administrator.

Click to show/hide the Implementing Fastpath's Assure Suite Series Index

Implementing Fastpath’s Assure Suite
Implementing Fastpath's Assure Suite: Who are Fastpath?
Implementing Fastpath's Assure Suite: What is Assure Suite?
Implementing Fastpath's Assure Suite: Pre-installation steps
Implementing Fastpath's Assure Suite: Sign Into Support Portal
Implementing Fastpath's Assure Suite: Download Assure Suite
Implementing Fastpath's Audit Trail: Configuration
Implementing Fastpath's Identity Manager: Configure AD Settings
Implementing Fastpath's Assure Suite: Run minimum permissions script
Implementing Fastpath's Assure Suite: Install the Hybrid Connection Manager
Implementing Fastpath's Assure Suite: Configure Hybrid Connection Manager
Implementing Fastpath's Assure Suite: Setup cloud connection
Implementing Fastpath's Assure Suite: Schedule security import
Implementing Fastpath's Assure Suite: Schedule Audit Trails data collection
Implementing Fastpath's Audit Trail: Grant AT Access
Implementing Fastpath's Audit Trail: Select company to audit
Implementing Fastpath's Audit Trail: Select tables to audit
Implementing Fastpath's Audit Trail: Create Triggers
Implementing Fastpath's Audit Trail: Apply templates
Implementing Fastpath's Audit Trail: Apply triggers to other companies
Implementing Fastpath's Audit Trail: Transfer between systems
Implementing Fastpath's Assure Suite: Create new portal user
Implementing Fastpath's Assure Suite: Assign Permissions
Implementing Fastpath's Audit Trail: Ad hoc data collect
Implementing Fastpath's Audit Trail: Review data changes
Implementing Fastpath's Audit Trail: View reports

Implementing Fastpath’s Assure Suite: What is Assure Suite?

FastpathThis post is part of the series on Implementing Fastpath's Assure Suite.

The Fastpath Assure Suite is a comprehensive security auditing tool for analysing segregation of duties, critical transactions and key access to systems. While it works with several systems, this series of posts is specifically looking at it working with Microsoft Dynamics GP.

Fastpath developed the Assure suite of tools to simplify security and audit needs by streamlining segregation of duties analysis and user access reporting. If your company is having trouble reviewing user access, recognizing access conflicts, or tracking what users do with their access, the Fastpath Assure suite has solutions to help. Separated into modules to allow proper reporting, the suite includes templates to make security or audit reviews easy to understand, shareable, and with scheduling automation, built for repeatable success.

Access Reviews

The Access Review module pulls user access data from your business software, allowing you to review and sign-off on access by user, company, role, and data sensitivity.

Audit Trail

The Audit Trail module tracks changes made to your business software, including schema changes. Audit Trail allows you design templates that focus on high conflict areas of change, creating efficient and easy-to-read reports.

Segregation Of Duties (SoD)

The SoD module analyses access in your business software by user or role, down to the lowest security level, reporting any conflicts or risks associated with the access.

Identity Manager

The Identity Manager module allows user provisioning to be fast and secure. Using this tool allows business process owners to request access directly from approvers without the need for IT intervention, streamlining the provisioning process. It also allows you to assign temporary (or firefighter) access.

Click to show/hide the Implementing Fastpath's Assure Suite Series Index

Implementing Fastpath’s Assure Suite
Implementing Fastpath's Assure Suite: Who are Fastpath?
Implementing Fastpath's Assure Suite: What is Assure Suite?
Implementing Fastpath's Assure Suite: Pre-installation steps
Implementing Fastpath's Assure Suite: Sign Into Support Portal
Implementing Fastpath's Assure Suite: Download Assure Suite
Implementing Fastpath's Audit Trail: Configuration
Implementing Fastpath's Identity Manager: Configure AD Settings
Implementing Fastpath's Assure Suite: Run minimum permissions script
Implementing Fastpath's Assure Suite: Install the Hybrid Connection Manager
Implementing Fastpath's Assure Suite: Configure Hybrid Connection Manager
Implementing Fastpath's Assure Suite: Setup cloud connection
Implementing Fastpath's Assure Suite: Schedule security import
Implementing Fastpath's Assure Suite: Schedule Audit Trails data collection
Implementing Fastpath's Audit Trail: Grant AT Access
Implementing Fastpath's Audit Trail: Select company to audit
Implementing Fastpath's Audit Trail: Select tables to audit
Implementing Fastpath's Audit Trail: Create Triggers
Implementing Fastpath's Audit Trail: Apply templates
Implementing Fastpath's Audit Trail: Apply triggers to other companies
Implementing Fastpath's Audit Trail: Transfer between systems
Implementing Fastpath's Assure Suite: Create new portal user
Implementing Fastpath's Assure Suite: Assign Permissions
Implementing Fastpath's Audit Trail: Ad hoc data collect
Implementing Fastpath's Audit Trail: Review data changes
Implementing Fastpath's Audit Trail: View reports

Implementing Fastpath’s Assure Suite: Who are Fastpath?

FastpathThis post is part of the series on Implementing Fastpath's Assure Suite.

Before getting to the main subject of the FastPath Assure Suite, I thought it might be useful to give an overview of the company who develops it.

That company is Fastpath which is the leading provider of security, audit and compliance solutions for Microsoft Dynamics GP as well as the Dynamics CRM and the other Microsoft ERPs (it is also where my co-author and fellow Dynamics GP blogger Mark Polino works).

Fastpath’s products aim to simplify compliance and improve security with tools to manage segregation of duties, track database changes and integrate Dynamics security with Active Directory for better user and password management (part of this latter element is covered by the Config AD product on which I blogged six years ago.

The main product is Fastpath Assure which is the main subject of this series. In the next post, I’ll describe in more detail what Fastpath Assure is and why there is a benefit to using it.

Click to show/hide the Implementing Fastpath's Assure Suite Series Index

Implementing Fastpath’s Assure Suite
Implementing Fastpath's Assure Suite: Who are Fastpath?
Implementing Fastpath's Assure Suite: What is Assure Suite?
Implementing Fastpath's Assure Suite: Pre-installation steps
Implementing Fastpath's Assure Suite: Sign Into Support Portal
Implementing Fastpath's Assure Suite: Download Assure Suite
Implementing Fastpath's Audit Trail: Configuration
Implementing Fastpath's Identity Manager: Configure AD Settings
Implementing Fastpath's Assure Suite: Run minimum permissions script
Implementing Fastpath's Assure Suite: Install the Hybrid Connection Manager
Implementing Fastpath's Assure Suite: Configure Hybrid Connection Manager
Implementing Fastpath's Assure Suite: Setup cloud connection
Implementing Fastpath's Assure Suite: Schedule security import
Implementing Fastpath's Assure Suite: Schedule Audit Trails data collection
Implementing Fastpath's Audit Trail: Grant AT Access
Implementing Fastpath's Audit Trail: Select company to audit
Implementing Fastpath's Audit Trail: Select tables to audit
Implementing Fastpath's Audit Trail: Create Triggers
Implementing Fastpath's Audit Trail: Apply templates
Implementing Fastpath's Audit Trail: Apply triggers to other companies
Implementing Fastpath's Audit Trail: Transfer between systems
Implementing Fastpath's Assure Suite: Create new portal user
Implementing Fastpath's Assure Suite: Assign Permissions
Implementing Fastpath's Audit Trail: Ad hoc data collect
Implementing Fastpath's Audit Trail: Review data changes
Implementing Fastpath's Audit Trail: View reports

Implementing Fastpath’s Assure Suite: Series Index

FastpathThis series of posts is on the Fastpath Assure Suite of products from Fastpath. I’ve dealt with this product a few times, but have recently implemented it twice, I thought a series of posts would be useful.

Over the course of the series, I will cover the installation and configuration of the Assure Suite, but with a specific focus on use of the Audit Trails module; I will return to the series in future and cover the use of the other modules.

Continue reading “Implementing Fastpath’s Assure Suite: Series Index”

Implementing Fastpath’s Config AD: Conclusion

FastpathIn this series of posts I have taken a look at the Config AD product from Fastpath which adds single sign-on to the Dynamics GP desktop client; you can find my series index here.

Over the course of the series I have run through the installation and configuration of several parts of Config AD, but there is still a lot of functionality that I haven’t covered.

For example, I have shown how to associate a GP user with a Windows AD account, but not how to disassociate them. I also didn’t show how SSRS security could also be assigned to users in Config AD; largely because I didn’t have SSRS installed and configured on my test box.

The main reason I haven’t covered even more than I have is that I enjoy playing around with different software and want to move onto something else. I’ve enjoyed the opportunity to have a go with Config AD which I found easy to install, easy to configure and that it provides a lot of functionality which brings together the security setup of Dynamics GP into one location.

Something I find very annoying in Dynamics GP is that to create a user, grant company access and assign roles you need to enter the System Password at least three times (unless you’re just copying security from another user wholesale), but Config AD allows you to configure all of this after logging into it once.

If you’re looking for an add-on which will both simplify the maintenance of Dynamics GP security (and I assume the effect would be the same for the other Dynamics products it integrates with) and allow for single sign on, then Config AD is definitely worth considering.

Click to show/hide the Implementing Fastpath's Config AD Series Index

Implementing Fastpath’s Config AD: Configuring Config AD Desktop

Microsoft Dynamics 365 Business CentralIn this series of posts I’m going to take a look at the Config AD product from Fastpath which adds single sign-on to the Dynamics GP desktop client; you can find my series index here.

With the Config AD Desktop installed, we need to configure it for use; many of the steps in this section are only required the first time you run Config AD Desktop on a machine.

Start Config AD Desktop from the Windows Start Screen (or Start menu for those on an older version of Windows) and click on File » options:

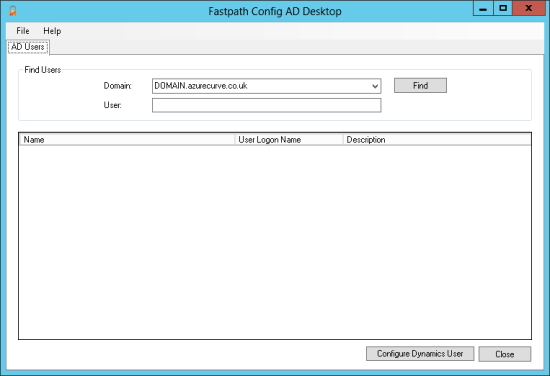
Fastpath Config AD Desktop

Continue reading “Implementing Fastpath’s Config AD: Configuring Config AD Desktop”

Implementing Fastpath’s Config AD: Installing Config AD Desktop

FastpathIn this series of posts I’m going to take a look at the Config AD product from Fastpath which adds single sign-on to the Dynamics GP desktop client; you can find my series index here.

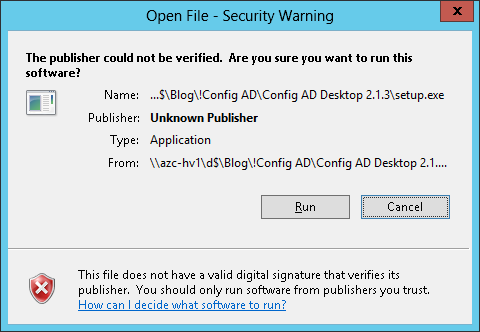
To install the Config AD Desktop run the setup.exe in the Config AD Desktop 2.1.3 folder and accept the security warning:

Open File - Security Warning

Continue reading “Implementing Fastpath’s Config AD: Installing Config AD Desktop”

Implementing Fastpath’s Config AD: Installing Config AD Desktop Prerequisites

FastpathIn this series of posts I’m going to take a look at the Config AD product from Fastpath which adds single sign-on to the Dynamics GP desktop client; you can find my series index here.

The Config AD Desktop requires that Config AD itself be installed. The installation on the client is the same as on the Domain Controller with one exception.

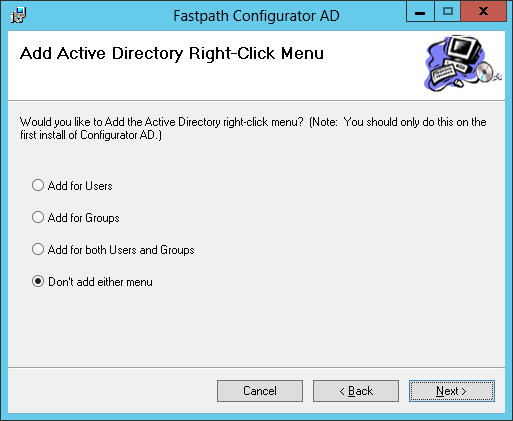
On the Add Active Directory Right-Click Menu tab set the option to Don’t add either menu:

Fastpath Configurator AD: Add Active Directory Right-Click Menu

Click to show/hide the Implementing Fastpath's Config AD Series Index

Implementing Fastpath’s Config AD: Configuring The Service

FastpathIn this series of posts I’m going to take a look at the Config AD product from Fastpath which adds single sign-on to the Dynamics GP desktop client; you can find my series index here.

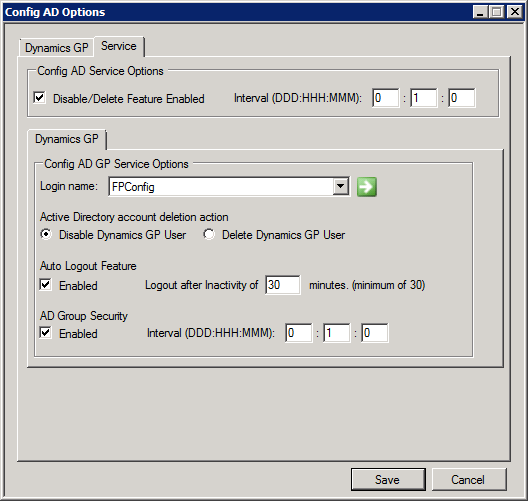
With the service installed, the next stage is to configure the service. This is done by accessing Config AD and then opening the Config AD Options (File » Options) and then select the Service tab:

On this tab there are several options which can be enabled/disabled:

  1. Disable/Delete Feature Enabled – When this option is enabled a choice can be made as to the interval the process cycles at and whether Dynamics GP users should be disabled or deleted when the AD account is deleted.
  2. Auto Logout Feature – This option will logout users after the specified number of minutes inactivity.
  3. AD Group Security – This option will provision new users and assign/revoke access to GP users based upon AD Group membership of AD Groups that are setup in Config AD for GP access

As well as the above options, you also need to specify the Login name that should be used to access SQL Server.

Click to show/hide the Implementing Fastpath's Config AD Series Index

Implementing Fastpath’s Config AD: Installing The Service

FastpathIn this series of posts I’m going to take a look at the Config AD product from Fastpath which adds single sign-on to the Dynamics GP desktop client; you can find my series index here.

Config AD includes a service which can run on any machine within the network; the service can automatically log users out after a period of inactivity and will also disable/delete GP user accounts when the AD user is deleted.

A service account is needed to run the Config AD service; this account needs to be a Domain User account and also needs to be either a Domain Admin or have the following permissions:

  1. Read Property and List Contents permission to the Deleted Objects container in Active Directory (non-admin users will not have these permissions by default, but they can be granted: further details available from Microsoft Support).
  2. Read All Properties permission to the container(s) where your users are located.
  3. Log on as a service permission.
  4. A SQL Login on the SQL Server for the domain user.

With a suitable service account, find the Fastpath.ADServiceSetup.msi in the /FPConfigAD 5.4.0.0/Config AD Service 3.3.0 folder.

Continue reading “Implementing Fastpath’s Config AD: Installing The Service”