ClassicPress Development with TortoiseGit: Commit

TortoiseGitWhen I started developing plugins for ClassicPress I decided that I needed to be using source control. As ClassicPress is intending to use GitHub for their plugin directory, it made sense for me to use it as well. This post is part of a series on ClassicPress Development with TortoiseGit which is a sub-series of the ClassicPress Development with GitHub series.

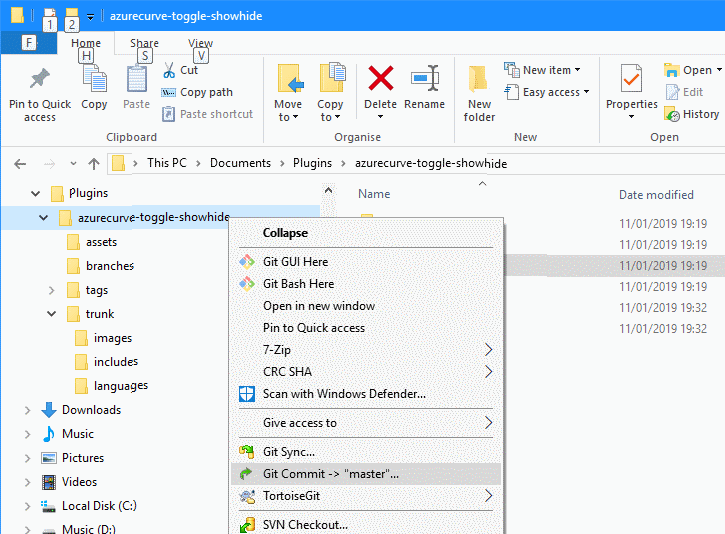
Once the repository has been cloned and changes made, you need to submit the changes back to the repository to keep control of changes. This is referred to as a “commit”. To commit your change, right-click the folder (or file) to commit and select Git Commit -> “master” on the context menu:

Git Commit

Continue reading “ClassicPress Development with TortoiseGit: Commit”

Implementing Fastpath’s Assure Suite: Schedule Audit Trails data collection

FastpathThis post is part of the series on Implementing Fastpath's Assure Suite.

The final step of the Fastpath Assure portal configuration is to schedule the collect of data for Audit Trails

To do this, log into the Fastath Assure portal and in the navigation pane select (Audit Trail » Setup » Manage Data) and click the calendar button.

Select the frequency and configure the other options (which change depending on the frequency) and click Schedule:

Schedule Collect Data Changes

In the above example I have set a daily frequency with the collect happening at 0500.

Implementing Fastpath's Audit Trail

Implementing Fastpath's Assure Suite

Implementing Fastpath’s Assure Suite
Implementing Fastpath's Assure Suite: Who are Fastpath?
Implementing Fastpath's Assure Suite: What is Assure Suite?
Implementing Fastpath's Assure Suite: Pre-installation steps
Implementing Fastpath's Assure Suite: Sign Into Support Portal
Implementing Fastpath's Assure Suite: Download Assure Suite
Implementing Fastpath's Audit Trail: Configuration
Implementing Fastpath's Identity Manager: Configure AD Settings
Implementing Fastpath's Assure Suite: Run minimum permissions script
Implementing Fastpath's Assure Suite: Install the Hybrid Connection Manager
Implementing Fastpath's Assure Suite: Configure Hybrid Connection Manager
Implementing Fastpath's Assure Suite: Setup cloud connection
Implementing Fastpath's Assure Suite: Schedule security import
Implementing Fastpath's Assure Suite: Schedule Audit Trails data collection
Implementing Fastpath's Audit Trail: Grant AT Access
Implementing Fastpath's Audit Trail: Select company to audit
Implementing Fastpath's Audit Trail: Select tables to audit
Implementing Fastpath's Audit Trail: Create Triggers
Implementing Fastpath's Audit Trail: Apply templates
Implementing Fastpath's Audit Trail: Apply triggers to other companies
Implementing Fastpath's Audit Trail: Transfer between systems
Implementing Fastpath's Assure Suite: Create new portal user
Implementing Fastpath's Assure Suite: Assign Permissions
Implementing Fastpath's Audit Trail: Ad hoc data collect
Implementing Fastpath's Audit Trail: Review data changes
Implementing Fastpath's Audit Trail: View reports

Implementing Fastpath’s Assure Suite: Schedule security import

FastpathThis post is part of the series on Implementing Fastpath's Assure Suite.

The penultimate step of the Fastpath Assure portal configuration is to schedule the automatic security import.

Log into the Fastpath Assure portal, expand Integrations, select Connections and click the calendar icon.

Set the required Frequency and Time and then click Schedule:

Fastpath Assure portal >> Automatic Security Import

Click to show/hide the Implementing Fastpath's Assure Suite Series Index

Implementing Fastpath’s Assure Suite
Implementing Fastpath's Assure Suite: Who are Fastpath?
Implementing Fastpath's Assure Suite: What is Assure Suite?
Implementing Fastpath's Assure Suite: Pre-installation steps
Implementing Fastpath's Assure Suite: Sign Into Support Portal
Implementing Fastpath's Assure Suite: Download Assure Suite
Implementing Fastpath's Audit Trail: Configuration
Implementing Fastpath's Identity Manager: Configure AD Settings
Implementing Fastpath's Assure Suite: Run minimum permissions script
Implementing Fastpath's Assure Suite: Install the Hybrid Connection Manager
Implementing Fastpath's Assure Suite: Configure Hybrid Connection Manager
Implementing Fastpath's Assure Suite: Setup cloud connection
Implementing Fastpath's Assure Suite: Schedule security import
Implementing Fastpath's Assure Suite: Schedule Audit Trails data collection
Implementing Fastpath's Audit Trail: Grant AT Access
Implementing Fastpath's Audit Trail: Select company to audit
Implementing Fastpath's Audit Trail: Select tables to audit
Implementing Fastpath's Audit Trail: Create Triggers
Implementing Fastpath's Audit Trail: Apply templates
Implementing Fastpath's Audit Trail: Apply triggers to other companies
Implementing Fastpath's Audit Trail: Transfer between systems
Implementing Fastpath's Assure Suite: Create new portal user
Implementing Fastpath's Assure Suite: Assign Permissions
Implementing Fastpath's Audit Trail: Ad hoc data collect
Implementing Fastpath's Audit Trail: Review data changes
Implementing Fastpath's Audit Trail: View reports

Implementing Fastpath’s Assure Suite: Setup cloud connection

FastpathThis post is part of the series on Implementing Fastpath's Assure Suite.

With the Hybrid Connection Manager configured, the next step of the configuration is to update the portal with the server settings. Log into the Fastpath Assure portal (or here if you’re in the UK), select Integrations and click Connections.

Click the cog icon and fill in the details for the GP Connection Settings; even if you’re using a named SQL Server instance, you can leave this box empty.

if you’re using Identity Manager, select your version of Microsoft Dynamics GP, selecting GP 2016 for that or any later version.

Click Save to save the changes:

Fastpath Assure portal - GP Connector Settings

Continue reading “Implementing Fastpath’s Assure Suite: Setup cloud connection”

Implementing Fastpath’s Assure Suite: Configure Hybrid Connection Manager

FastpathThis post is part of the series on Implementing Fastpath's Assure Suite.

With the Hybrid Connection Manager installed, the next step is to configure it to see the portal.

From the Windows Stat menu launch the Hybrid Connection Manager and click the Enter Manually button:

Hybrid Connection Manager

Continue reading “Implementing Fastpath’s Assure Suite: Configure Hybrid Connection Manager”

Implementing Fastpath’s Assure Suite: Install the Hybrid Connection Manager

FastpathThis post is part of the series on Implementing Fastpath's Assure Suite.

The next Fastpath Assure Suite to install is the Hybrid Connector; this is the on-premise component which initiates the communication channel with the Fastpath portal.

One of the files downloaded is the Hybrid Connector installer; launch the HybridConnectionManager.msi and accept the terms of the license agreement and click the Install button:

Hybrid Connection Manager Setup - License Agreement

Once the installation is complete, click the Finish button:

Hybrid Connection Manager Setup - Completing the Hybrid Connection Manager Setup Wizard

Click to show/hide the Implementing Fastpath's Assure Suite Series Index

Implementing Fastpath’s Assure Suite
Implementing Fastpath's Assure Suite: Who are Fastpath?
Implementing Fastpath's Assure Suite: What is Assure Suite?
Implementing Fastpath's Assure Suite: Pre-installation steps
Implementing Fastpath's Assure Suite: Sign Into Support Portal
Implementing Fastpath's Assure Suite: Download Assure Suite
Implementing Fastpath's Audit Trail: Configuration
Implementing Fastpath's Identity Manager: Configure AD Settings
Implementing Fastpath's Assure Suite: Run minimum permissions script
Implementing Fastpath's Assure Suite: Install the Hybrid Connection Manager
Implementing Fastpath's Assure Suite: Configure Hybrid Connection Manager
Implementing Fastpath's Assure Suite: Setup cloud connection
Implementing Fastpath's Assure Suite: Schedule security import
Implementing Fastpath's Assure Suite: Schedule Audit Trails data collection
Implementing Fastpath's Audit Trail: Grant AT Access
Implementing Fastpath's Audit Trail: Select company to audit
Implementing Fastpath's Audit Trail: Select tables to audit
Implementing Fastpath's Audit Trail: Create Triggers
Implementing Fastpath's Audit Trail: Apply templates
Implementing Fastpath's Audit Trail: Apply triggers to other companies
Implementing Fastpath's Audit Trail: Transfer between systems
Implementing Fastpath's Assure Suite: Create new portal user
Implementing Fastpath's Assure Suite: Assign Permissions
Implementing Fastpath's Audit Trail: Ad hoc data collect
Implementing Fastpath's Audit Trail: Review data changes
Implementing Fastpath's Audit Trail: View reports

ClassicPress Development with TortoiseGit: Clone Repository

TortoiseGitWhen I started developing plugins for ClassicPress I decided that I needed to be using source control. As ClassicPress is intending to use GitHub for their plugin directory, it made sense for me to use it as well. This post is part of a series on ClassicPress Development with TortoiseGit which is a sub-series of the ClassicPress Development with GitHub series.

With TortoiseGit installed we can start using it for managing source control on projects. The first thing you will want to do is to make a copy of your GitHub repository on your PC so you can amend files. In TortoiseGit terms this is done by cloning the repository.

On my local PC I have a folder called Plugins into which I want to close a repository. To do this, right-click the folder and select Git Clone from the context menu:

Right-click menu showing the clone option

Continue reading “ClassicPress Development with TortoiseGit: Clone Repository”

ClassicPress Development with TortoiseGit: Update

TortoiseGitWhen I started developing plugins for ClassicPress I decided that I needed to be using source control. As ClassicPress is intending to use GitHub for their plugin directory, it made sense for me to use it as well. This post is part of a series on ClassicPress Development with TortoiseGit which is a sub-series of the ClassicPress Development with GitHub series.

TortoiseGit is like any other application and should be updated when an update is available. Fortunately, it comes with automatic updates includes. You will receive a popup telling you there is an update available; click Download to download the new version:

Check For Updates - TortoiseGit: New version available

Continue reading “ClassicPress Development with TortoiseGit: Update”

Implementing Fastpath’s Assure Suite: Run minimum permissions script

FastpathThis post is part of the series on Implementing Fastpath's Assure Suite.

One of the components of the installation of Assure Suite is the Hybrid Connector; this is what allows the Fastpath Assure portal to communicate with the on-premise Dynamics GP databases. Before we can install the Hybrid Connector, we need to create the SQL login which it will use to connect and provide the required permissions.

Fortunately, Fastpath provide a GPHybRidGrants.sql script which both creates the login and assigns the minimum level of permissions required for the Hybrid Connector to connect. The script is available via a link on one of the emails sent by Fastpath.

GPHyrbidGrants.sql

There are three variables in the script to change which you can do with a global find and replace:

  • dbreplace which is the GP system database (called DYNAMICS by default).
  • userreplace which is the SQL login to be created.
  • pwdreplace which is the password for the SQL login.

Once the script has been run, the Hybrid Connector can be installed which I will be doing in the next post.

Click to show/hide the Implementing Fastpath's Assure Suite Series Index

Implementing Fastpath’s Assure Suite
Implementing Fastpath's Assure Suite: Who are Fastpath?
Implementing Fastpath's Assure Suite: What is Assure Suite?
Implementing Fastpath's Assure Suite: Pre-installation steps
Implementing Fastpath's Assure Suite: Sign Into Support Portal
Implementing Fastpath's Assure Suite: Download Assure Suite
Implementing Fastpath's Audit Trail: Configuration
Implementing Fastpath's Identity Manager: Configure AD Settings
Implementing Fastpath's Assure Suite: Run minimum permissions script
Implementing Fastpath's Assure Suite: Install the Hybrid Connection Manager
Implementing Fastpath's Assure Suite: Configure Hybrid Connection Manager
Implementing Fastpath's Assure Suite: Setup cloud connection
Implementing Fastpath's Assure Suite: Schedule security import
Implementing Fastpath's Assure Suite: Schedule Audit Trails data collection
Implementing Fastpath's Audit Trail: Grant AT Access
Implementing Fastpath's Audit Trail: Select company to audit
Implementing Fastpath's Audit Trail: Select tables to audit
Implementing Fastpath's Audit Trail: Create Triggers
Implementing Fastpath's Audit Trail: Apply templates
Implementing Fastpath's Audit Trail: Apply triggers to other companies
Implementing Fastpath's Audit Trail: Transfer between systems
Implementing Fastpath's Assure Suite: Create new portal user
Implementing Fastpath's Assure Suite: Assign Permissions
Implementing Fastpath's Audit Trail: Ad hoc data collect
Implementing Fastpath's Audit Trail: Review data changes
Implementing Fastpath's Audit Trail: View reports

Implementing Fastpath’s Identity Manager: Configure AD Settings

FastpathThis post is part of the series on Implementing Fastpath's Identity Manager and is part of the parent Implementing Fastpath's Assure Suite series.

With the Active Directory Connector installed the next step is to configure the Fastpath Assure portal to connect with it.

The Fastpath Assure portal is available at https://www.fastpathassure.com (or https://uk.fastpathassure.com if you’re in the UK). Hit the Login button:

Fastpath Assure login

Continue reading “Implementing Fastpath’s Identity Manager: Configure AD Settings”